All SIDC staff can use Zoom to host online meetings and webinars. This guide walks you through the steps of hosting a meeting or webinar.
Prepare Your Technology
Equipment Needed:
- A computer with an internet connection (wired connection recommended)
- USB plug-in headset with a microphone (recommended for optimal audio quality)
- Dual monitors (recommended)
- Webcam (optional): built-in or USB plug-in
NOTE: If you do not have a USB plug-in headset with a microphone, you can use the telephone to host a meeting or webinar.
Download The Zoom Desktop Application
You must download and install the Zoom desktop application to host meetings and webinars. The Zoom desktop application is a one-time download that does not require administrative rights to download and install on your computer. To download the Zoom desktop application on your computer, follow the steps below. To download the Zoom app on your mobile device, visit the App Store for iOS or Google Play for Android and search for Zoom.
- Open a web browser and navigate to https://zoom.us/download .
- Click the Download button for Zoom Client for Meetings. There is no separate download for Zoom webinar.
- Follow the prompts to download and install Zoom on your computer.
If you have difficulty downloading and installing Zoom, please contact the Digital Service (DS).
Meeting with More Than 40 Minutes and Multiple attendees
For a meeting with more than 2 attendees and more than 40 minutes duration, please request Digital Services (DS) to setup a Zoom Meeting with information below:
- Topic
- Description (optional)
- Date of meeting
- Time
- Duration
- Meeting Password (if required)
Once the meeting is created, DS will provide the information below:
- Meeting ID. With meeting ID, staff can share the meeting in Slack Application using the zoom command: /zoom join [Meeting ID]
Sample: /Zoom Join 288-174-892
The zoom share meeting will appear as below:
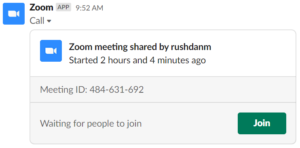
The staff in the Slack channel can simply join the meeting by clicking the join button.
- Draft Meeting Invite email. Staff can send the meeting to the attendees using email
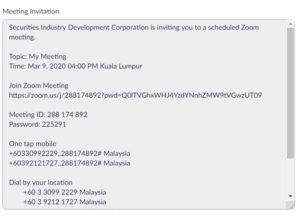
Alternatively, staff can initiate the meeting using their own zoom account by creating the email in the zoom application. Staff can also initiate a meeting using Slack application with the following command:
/zoom Meeting [Topic of the meeting]
Sample: /zoom meeting HR Meeting
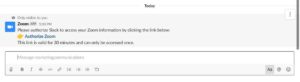
For first time user, zoom application in Slack need to be authorized as below screen:
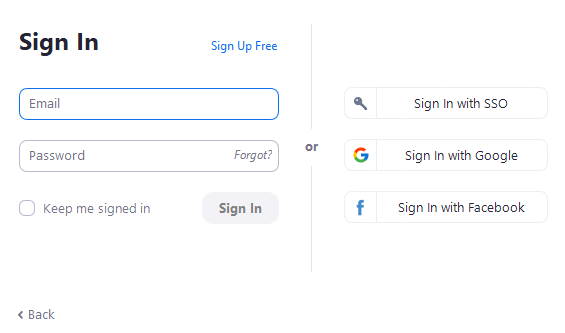
Sign in and Join
After launching Zoom, click Join a Meeting to join a meeting without signing in. If you want to log in and start or schedule your own meeting, click Sign In.

To sign in, use your Zoom, Google, or Facebook account. If you don’t have an account, click Sign Up Free. If you have a Zoom account but cannot remember your password, click Forgot.
Home
After signing in, you will see the Home tab, where you can click these options:
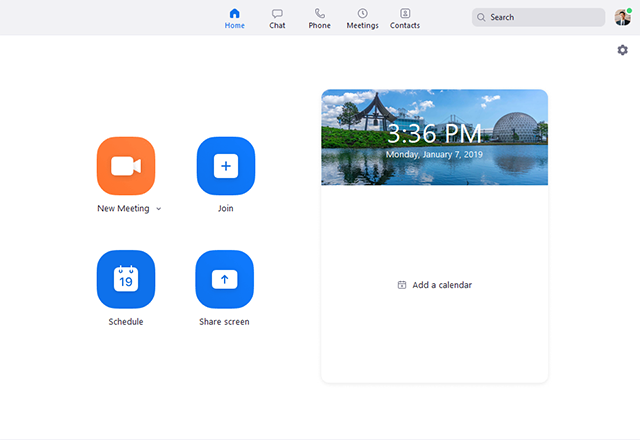
- New Meeting: Start an instant meeting. Click the downwards arrow to enable video or use your personal meeting ID (PMI) for instant meetings.
- Join: Join a meeting that is in progress.
- Schedule: Set up a future meeting.
- Share Screen: Share your screen in a Zoom Room by entering in the sharing key or meeting ID.
- Date and time with background image: To change the background image, hover over the picture and click the camera icon.

- Upcoming meeting: Displays the next meeting for the current day. Add a third-party calendar service if you want to sync upcoming meetings.
- Click your profile picture for these options:
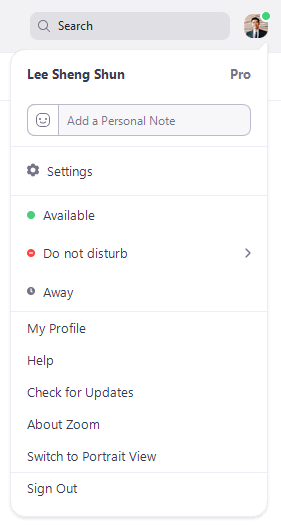
- Add a personal note.
- Settings: Access settings you can change in the client.
- Change your status to Available, Away, or Do Not Disturb.
- My Profile: Open the Zoom web portal to edit your profile.
- Help: Open the Zoom Help Center.
- Check for Updates: Check if Zoom is up to date.
- About Zoom: View the current version.
- Switch to Portrait View: Switch the Zoom window to portrait view if you prefer a narrower window.
- Sign out
Chat
Select the Chat tab to view private conversations with your contacts or group conversations (channels).
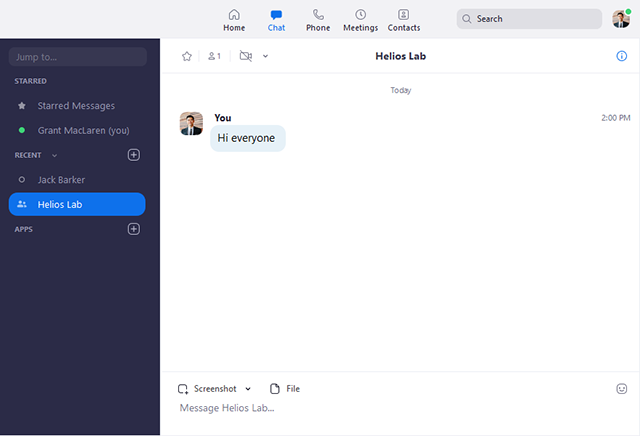
You can access these features in the left-side panel:
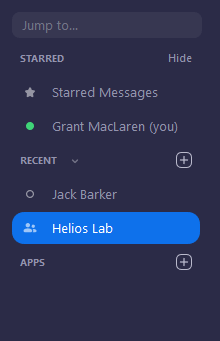
- Jump to search box: Search for a contact or channel.
- Starred Messages: View messages you have starred.
- Click your name to use your personal chat space.
- Add icon
 (next to Recent): Start a new chat with one of your contacts, create a channel for group chats, or join an existing channel.
 - Under Recent, click a contact to view chat history and continue to chat with them. Contacts have a status icon before their name.

- Under Recent, click a channel (indicated by the group icon before the name) to view the channel’s chat history and send messages to channel members.

After selecting a contact or channel in the left-side panel, you can use these features in the chat window:
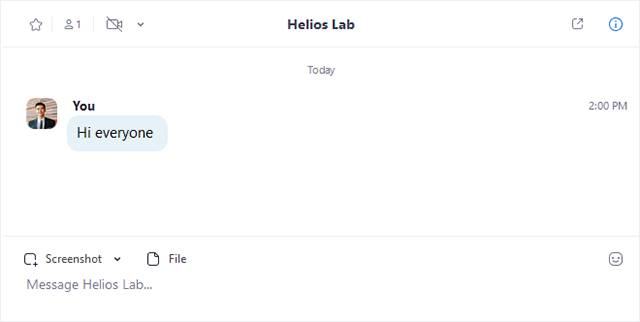
- Star icon
 : Add the contact or channel to your starred list, giving you quick access to those contacts or channels.
 - Video icon
 : Start a meeting with the contact. If a channel is selected, this will start a meeting with all members of the channel.
 - New window icon
 (hover your pointer over the contact or channel name to display this icon) : Opens the selected chat in a new window.
 - Info icon
 : View additional options for the contact or channel. Also gives you quick access to files, images, and starred messages in the selected chat.
 - Message box: Compose and send messages to your contact or channel. You can also send screenshots, files, code snippets, and animated GIFs.
Meetings
Select the Meetings tab and click Upcoming to view, start, edit, and delete scheduled meetings.
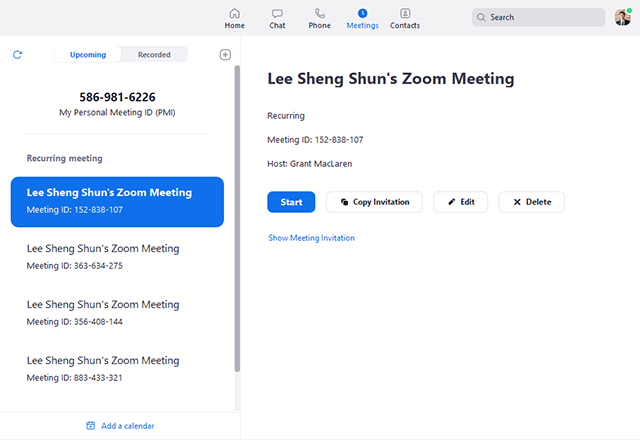
You can click the following options after selecting a scheduled meeting in the left-side panel:
- Add icon
 : Schedule a new meeting.
 - Refresh icon
 : Refresh the meeting list if you don’t see your scheduled meeting.
 - Start: Start the scheduled meeting that you have selected in your upcoming meetings.
- Copy Invitation: Copy the scheduled meeting’s invitation text, allowing you to manually paste into an email, instant messenger etc. Click Show Meeting Invitation if you want to view the invitation you’re copying.
- Edit: Edit the meeting options for your scheduled meeting.
- Delete: Permanently delete your scheduled meeting.
Contacts
Select the Contacts tab to view and manage your contacts.
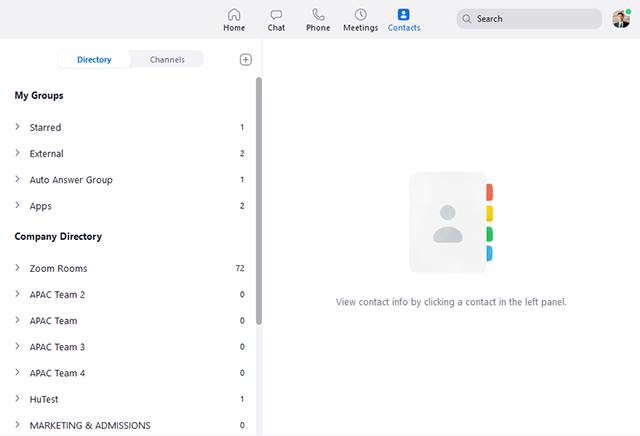
- Directory tab: View a directory of all your contacts, including starred, external, and auto answer contacts. If your organization has Zoom Rooms, you will also see a list of Zoom Rooms.
- Channels tab: View a directory of your channels (used for group messaging). Starred channels appear at the top of the list.
- Add icon : Show options for contacts and channels. You can add a contact, create a contact group, create a channel, or join a channel.
In-Meeting Controls
Once you have started or joined a meeting, you can access the meeting controls located at the bottom of the meeting window (move your mouse in the Zoom window to display meeting controls).
Learn more about meeting controls for hosts, co-hosts, and attendees. You can also join a test meeting to familiarize yourself with meeting controls before joining a scheduled meeting.
Start a Meeting
While there are several ways to start a meeting, it is recommended that you start your session using the Zoom desktop application. This will ensure you are the host of your meeting.
NOTE: If you do not start the meeting by logging in to the Zoom desktop application or the Penn State Zoom Web Portal, you will join your meeting as a participant.
- Open the Zoom desktop application in your computer’s programs list or dock.
- Click Sign in with SSO.
- Type PSU in the company domain field.
- Click Continue.
- At the bottom of the Zoom application, click the Meetings tab.

Figure 8: The Meetings tab on the Zoom desktop application
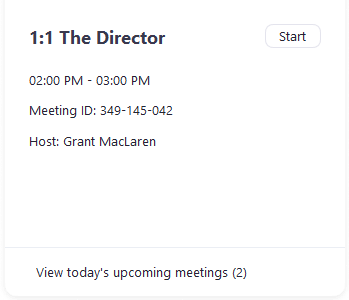
- All your upcoming meetings and webinars are listed on the Meetings tab. Hover your mouse over the meeting or webinar you want to start and click Start.

Figure 9: Start button for an upcoming meeting
- An audio conference options dialog box will display with tabs for Phone Call or Computer Audio.
- Select the desired audio option from the dialog box displayed.
- The meeting interface will display including the Meeting ID in the upper left corner of the screen.
- To display the menu bar at the bottom of the meeting window, move your mouse over the lower part of the screen.

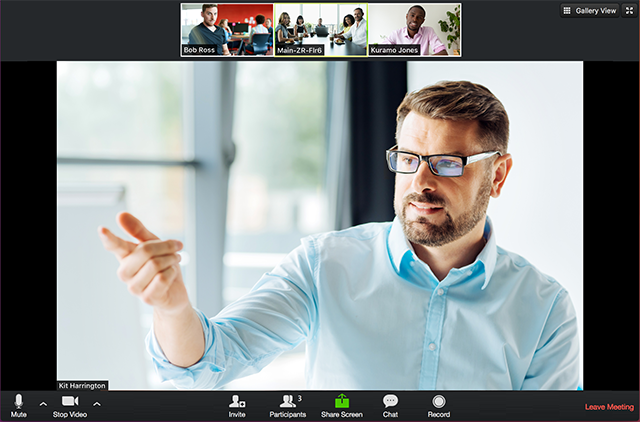
Figure 10: Host meeting interface with no video or screen sharing displayed
NOTE: You can also start a meeting by navigating to Penn State Zoom Web Portal https://psu.zoom.us/meeting, clicking the Meetings tab, and clicking the Start button that appears to the right of the meeting name. If starting a meeting from a mobile device, enter the Meeting ID into the mobile app.
Mute/Unmute Audio and Adjust Audio Options
- To unmute yourself and begin talking, click the Unmute button (microphone) in the bottom-left corner of the meeting window.
- To mute yourself, click the Mute button (microphone). A red slash will appear over the microphone icon indicating that your audio is now off.
- To test your computer microphone and speakers or change your audio input device, click the arrow on the microphone icon and select Test Speaker & Microphone.
- To switch from computer audio to phone audio, click the arrow on the microphone button and select Switch to Phone Audio. A dialog box will appear with a phone number, the Meeting ID, and your Participant ID. After dialing the phone number, you will be promted to enter the Meeting ID and Participant ID on your phone’s keypad.
Start/Stop Video and Adjust Video options
- Click the Start Video button in the menu bar at the bottom to begin your video.
- Click the Stop Video button to stop sharing your video stream.
- To choose a different webcam or adjust your video settings, click the up arrow to the right of the Video icon and select Video Settings.
When video is activated, display options are available in the upper right of the screen and in the upper right of each participant’s window in both Speaker View and Gallery View.
NOTE: If you choose not to turn on your webcam in the meeting and video has been activated, your video window will contain either your name, email address, or a photo, depending on how your profile is set up in the Penn State Zoom Web Portal.
Record the Meeting
Per Pennsylvania wiretapping law, you must inform participants if you plan on recording the session. Also, discussion of High-risk or Restricted data (as defined in AD95) is not permitted while recording.
- Click the Record button in the menu bar at the bottom.
- Choose Record to this Computer or Record to the Cloud.
- Click the Stop Recording icon in the menu bar to finish the recording.
NOTE: Local recordings are automatically saved to the local computer when the host ends the meeting.
Manage Participant Audio and Video
Hosts can control participant audio and video using the tools in the Participant panel. The Participant panel allows you to easily see who has audio and video connected, which is helpful information when troubleshooting participant audio issues.
To mute or unmute participants:
- Click the Manage Participants button in the Zoom toolbar at the bottom of the Zoom meeting window.
- To mute or unmute all participants, use the Mute All and Unmute All buttons at the bottom of the Participant panel.
- To mute or unmute an individual participant, hover over the person’s name in the Participant panel.
- Choose Mute or Unmute.
Participants have the ability to unmute themselves in a meeting. To take away the ability for participants to unmute themselves:
- Click the Manage Participants button in the Zoom toolbar at the bottom of the Zoom meeting window.
- Click the More button at the bottom of the Participant Panel.
- Uncheck the option Allow participants to unmute themselves.
Hosts cannot turn on a participant’s video. However, hosts can also turn off a participant’s video or request a participant turn on his or her video. To manage participant video:
- Click the Manage Participants button in the Zoom toolbar at the bottom of the Zoom meeting window.
- Hover your mouse over a person’s name.
- Click More.
- Select Ask to Start Video or Stop Video.
Collect Feedback with Nonverbal Feedback Icons
Nonverbal feedback icons allow the host to quickly collect feedback and responses from participants without using chat. Nonverbal feedback icons include a raise hand, yes, no, thumbs up, away, etc. This feature must be enabled in the host’s meeting settings in the Zoom Web Portal prior to the meeting.

Figure 11: Participant panel with nonverbal feedback icons displayed
- Click Manage Participants in the Zoom toolbar at the bottom of the Zoom meeting window.
- Ask participants to use the available icons to respond to questions or to indicate a need, such as go slower.
- Click the Clear All icon to clear the icons from the participant panel, if necessary.
Send Messages with Chat
- Click the Chat icon in the menu bar to open the Chat window.
- Type your message in the Text box at the bottom of the window.
- Press Enter to send.
- To send a message to a single participant, click the down arrow in the To: field and select the participant’s name.
- Be sure to change back to Everyone in order to communicate with the entire group.
NOTE: When you receive a chat message while screen sharing, the menu bar displays and the More button blinks. Click the More button, select Chat from the list, and the Chat panel displays.
Share Your Screen or A Whiteboard
Both the host and participants can share their screen or a whiteboard in Zoom. When sharing your screen, the Zoom menu bar moves from the bottom of the Zoom window to the top, and will disappear from view until you roll your mouse over the area. You can reposition the menu bar by clicking and dragging it another location on your computer, such as a second monitor. Additional tools, such as Chat, Remote Control, and Audio options are moved under the More button.
- Click the Share Screen button on the menu bar.
- Select the desktop or application you would like to share, or select whiteboard to share a whiteboard. Selecting Desktop will allow you to share everything on your desktop.
- Click the Share Screen.
- If you receive a chat message while you are screen sharing, the More button will blink. To view the chat message, click the More button and select Chat from the list.
- To annotate in a screen share, click the Annotate button to open the annotation menu. Use the draw tools (arrows, shapes) to direct participants’ attention to an area of your screen or use the text tool to type notes on the screen.
- To close the annotation menu, click the X in the upper right of the annotation menu.
- Click the More icon to view additional host tools, such as breakout rooms, record to the cloud or local computer, and end the meeting.
- Click Stop Share in the small menu bar to stop sharing your screen.
NOTE: Participants can share their screens in the meeting if the host is not actively sharing. To disable screen sharing for participants, click the up arrow to the right of the Share Screen button in the Zoom toolbar and select Advanced Sharing.
Allow a Participant to Control Your Screen
The remote control option in Zoom allows you to give a participant control of your screen.
- Share your screen if you have not already done so.
- Click the Remote Control icon in the menu bar
- Select the person’s name. A note will appear on that person’s screen indicating he or she now has control of your screen.
- To take back control, click the Remote Control icon in the menu bar again, and select Stop Remote Control.
NOTE: If you have shared your desktop, the individual with control will be able to open, edit, or delete any files.
End a Meeting
- Click the End Meeting option on the right side of the menu bar to the close the meeting.
- Click End Meeting for All to end the meeting and begin the rendering process for the session recording and reports.
NOTE: If you recorded the meeting locally, a dialog box will appear indicating the recording is being rendered and allows you to select where you would like to save the video.
More Resources
- Watch the Getting Started Videos
- Join our Weekly Zoom Meetings and Webinar training
- Join a test meeting